DEALER PORTAL

Use CTRL+G on a PC or Command+G on a Mac to find the next instance of a word.
News & Updates
Documentation Process
Application Submission and General Updates
Takedowns
Getting Started
Dealer Portal Account Access
Raymond Dealer users will have SSO (Single Sign On) experience. As a Raymond Dealer, you will log in using your existing Raymond credentials when accessing the new system, similar to how you accessed DMS.
To access the Dealer Portal, click here.
Note: The Dealer Portal can be accessed through Google Chrome, Microsoft Edge, Mozilla, Firefox, and Safari.
If you are having trouble logging in, please email RLCDealerPortal@raymondcorp.com. Please include a screenshot of the error you are receiving.
Don’t have an account set up? Request Dealer Portal access by submitting this FORM.
Updating Your Profile
Click on the upper right-hand corner at the down arrow. Click for the dropdown and select My Profile.

A screen with personal data details will appear. Here, you can update your contact information and profile picture. Your Partner (Dealer) name, email address, and Role are not editable.

Click submit to save the profile changes.
Forgot Your Password
This section will not apply if you utilize Raymond Corp. single sign-on (SSO) access.
If needed, you can select “Forgot Password” at the main login screen and follow the prompts.
Dealer Dashboard
Creating a Credit Application
You can create a credit application in one of two ways:
1. From the Home Screen – Click the option to start a new credit application. (Need a screenshot?)
– or –
2. From the Applications Menu – Located on the Dashboard, this menu allows you to initiate a new credit application.

Progress Wizard
At the top of the application, the Progress Wizard helps track progress and navigate sections:
• Customer Details (Deal/Credit Request)
• Guarantors & Co-Applicants (Deal/Credit Request)
• Assets (Deal Request Only)
• Structure (Deal Request Only)
• Preview (Deal/Credit Request)
Example of Progress Wizard for a Deal Request (5 Nodes)
Example of Progress Wizard for a Deal Request (3 Nodes)
The credit application number is displayed in the top left corner for easy reference.

Customer Details Node
The Customer Details section is the first step in creating a credit application.
Step 1: Choose the Transaction Type
1. Deal Request – Use this option to either:
o Draw upon an existing credit line.
o Create transactional applications outside of a credit line.
2. Credit Request – Used when requesting and establishing a new credit line.
The system defaults to Deal Request as the transaction type.


Generate a Quote Sheet
1. Create a new application

2. Enter all information into the application and once you complete the Structure section, you will be able to generate a quote sheet.
Note: You can do this with one or multiple structures
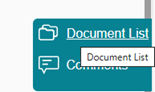
3. Navigate to the blue panel on the right side of the screen and select Document List
4. You should not see any imported documents at this time. Select Import Document Types and locate the Quote Sheet. Select it and then click OK.
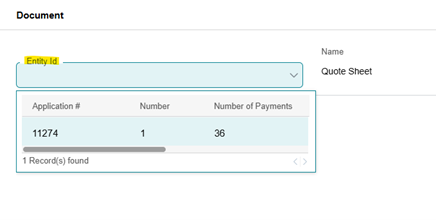
5. To Generate the quote sheet, you will need to select an entity to attach to it. Select the line, click the 3 dots to the right of the line and select View/Edit

6. Click on the dropdown in the Entity Id field and select the entity Id that appears. If you have multiple structures, you will have to select the one you want as a quote sheet. Once selected, click OK.
7. Select the Quote Sheet line and click Generate at the bottom of the screen to generate your quote sheet.

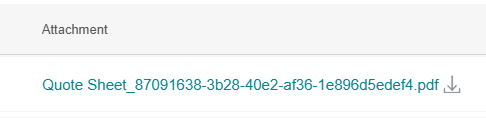
8. Scroll over to the right to view your generated quote sheet as an attachment.
***If you have additional structures you created that you want to have quote sheets generated for, you will have to select Import Document Type and select the Quote Sheet from the list and repeat the steps above.
9. Click Submit at the bottom of the screen to save your changes prior to exiting.
10. You can now submit to credit for approval.
Important/Helpful notes regarding the Quote Sheet:
• You can generate the Quote Sheet at different times throughout the process:
o Immediately after creating your structure(s)
o Immediately following submission to Credit (quote sheet should auto import but you can always import additional quote sheets)
o Anytime after credit approval has been received
• The new Quote Sheet lists out if sales tax has been capitalized and what the estimated sales tax amount is
Locations
1. Every asset line needs a location code added. You can search for the code in the Location Code dropdown, and any approved locations for that customer already in the system will be shown here. If you do not see your code, please click the toggle for “Create Location.”
2. When creating a NEW location, please only create that location on your FIRST asset. You can now proceed without adding locations to any additional assets while you wait for RLC to approve the newly created location. If this is a time-sensitive matter, please reach out directly to RLC via email or phone to have the location approved—do not send a service request.

• Click inside the Location Code box
• Hold SHIFT key and hit the right arrow key to navigate between search parameters
• Search by : Code, Name, City, State, Address, and Postal Code
• Start typing in your information and your location will appear in the dropdown if it matches anything in the system

For Raymond Quotes
“Easy Button” Submittal
Pulling Raymond Quote
The Pull Application field (also known as the Easy Button) allows you to quickly retrieve application details from your CRM quote.
Steps to Use the Pull Application Feature:
1. Click “Create Application“
2. Enter the CRM Q# and click “Add“
3. Select the desired Program (Published Rate)
4. Click “Pull Application“.
5. Now choose an existing customer from the dropdown or enter information for a new customer.
6. Review the imported customer details and click Proceed. At this point, you can update the location address as needed.
Dealer Portal Documentation
In Order to generate lease documentation for your application you will need to follow the following steps in the system:
Find your Accepted application from the main landing page either in the Home Tab or Applications tab. — It must be in the Accepted status or you will not be able to generate. Right click on your transaction to prompt the menu to appear. Select Final Review.

This will open a new page: The Top lists your general details for Credit approval status and asset details.

The bottom half of the screen had your serial number information and structure.

In the structure box you will need to select the one your customer has chosen to move forward with.
Click on the circle next to Structure to select.

Next look for the Ready for Documentation.

Hover over the No and click on it until you see a box appear:

Click on the box to get the Yes to appear:

Once you get the yes to appear the next step it to click Save in the bottom Right corner of the page.

The following message will appear at the top.

Now you are ready to begin to generate your required documents for the Lease package. There is blue/green banner in the middle right of the page.

When you hover over this it will expand:

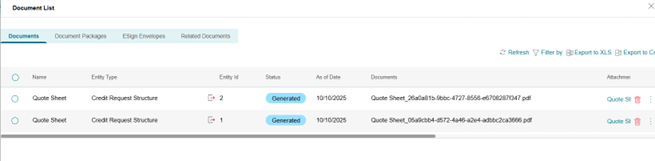
Click on the Documents List and a page will slide in from the right:

This will update your status and fill in a description.

If you have a document that did not auto import based on you application type go to the bottom of the screen to see the following buttons:

Choose the “Add Document Types” a panel will slide in from the right with a list of additional documents to generate:

Choose the document you are missing by clicking on the circle to the left of the title and click “ok” at the bottom right of the screen.

This will bring the document back into the documents list to be generated.

There are two ways you can create your packet and send through DocuSign for signature:
Option 1 – Generate all documents and Pack at another time.
Option 2 – Generate And Pack any documents at the same time.
**You can send as many packets through DocuSign as needed for an application.
Any generated documents will have a blue hyperlink under the Attachment section (you may need to scroll over to view this). You will be able to click this and a PDF copy of the document will pop up on your screen or in your Downloads.
Once you have generated and packed your documents, a slide out will appear asking you to enter a packet name
Enter the packet name and click OK

Once you have added a packet name, your packet will show in the Document Packages section.

To send a packet through DocuSign for signature, you will need to navigate to the ESign Envelopes tab.

Click on the Add Envelopes button at the bottom of the screen to start the DocuSign process.

A new screen will appear after clicking Add Envelopes and you can begin entering the information in. Enter the Subject and Message (Message is optional).

Next you will have to click Import to attach the packet or documents you want to send for e-signature. Select the documents or packet and click OK.


Your imported attachments will show on the main e-signature screen. You can delete any that were accidentally imported if needed.

Next you will need to import your recipients. Click the Import button.


Your imported contacts will show on the main e-signature screen. You can delete any that were accidentally imported.

In order to send to someone at your dealership for their signature on any of the lease documents, you will need to import one of the contacts again but edit the name and email address for that contact. You can do this by hovering over the name and email address and clicking on them. It will then allow you to edit those fields.
You can also select the contact and click View/Edit. You will then get this slide in and can edit the information here.

The hierarchy can be changed if the order for the signers needs to be different than how they were originally imported (1,2,3,etc.)
Once you have imported and edited your contacts, click OK.
Your envelope will then appear on the main ESign Envelope screen.
Select the line with the envelope you want to send for e-signature and click the Send Envelope button.

Immediately after clicking Send Envelope, a new window with DocuSign should appear on your screen. If not, it may be blocked as a pop-up so you will have to Allow Pop-ups.

Utilize the tool bar on the left side to add in the signature fields, etc onto your documents. Once you are finished, hit SEND.
Once DocuSign has been sent, navigate back to the ESign Envelope screen in the Dealer Portal and click SUBMIT.
To view the status of your ESign envelope, navigate back to the Document List on that specific application. Go to the ESign Envelopes tab and select the envelope, then click the Refresh button at the bottom of the screen.

You can refresh this at any time throughout the signing process. There will be a different status listed for each step.
Once completed by all signers, the envelope will show as being completed accompanied by the date and time it was completed.

To view the completed envelope, click the 3 dots on the right side and select View/Edit. You can then view the completed attachment (highlighted below).

Takedowns
Takedowns after you have signed and completed Lease documents from the customer.
Navigate to the Applications tab and use the dropdown to select View Applications.
In the list of applications find the accepted application you wish to Takedown. This will be the process to submit the lease Application to RLC for review of signed lease documents, Maintenance agreements, Direct payment forms and any other necessary documents with Invoice from the dealer for us to complete processing.
At the far right select the three buttons for the application you want to start with Final Review.

Select the final review option in the menu provided when you click the three vertical buttons. Once you do this you will scroll to the bottom of the page until you see the structures you set up on the application listed:

You will select the Structure you wish to move forward with for funding. in this box you will see Takedown in the center. If you hover over the No a check box will appear.

Click inside the box to change the No to a Yes.

The initiate Takedown – button will be in the bottom right corner of the screen.

You will need to go through this step there will be a slide in to acknowledge this has completed.
Go back to the application list to locate your application number.

In order to move on the next step if the process when you get back to this page your application must be in the ”Accepted” status. If it states ”Takedown in progress” you will need to wait for this to change. Please use the refresh arrows until it is updates. This should only take a few minutes.

This time you will select the Takedown option from the dropdown.
Here it provides you with a contract number and the current status of your Takedown:

Click on the three dots to the right of the contract # listed.

Select Resume Takedown Structure:

Make sure that all of your information is correct and then Select ”Complete Takedown”
Your next screen will look like this:

If the message reads still “Takedown in Progress” please use the refresh arrows to update.

You are now okay to close this screen by clicking on one of the menus at the top.
Migrated Applications
Step 1: Locate your migrated application
Step 2: Right Click on it and select Amend

Step 3: Click Proceed until you arrive at the Assets node

Step 4: Select each asset and scroll down to the Equipment Address section. You will need to select an existing location from the Location Code dropdown or create a new location if you do not see it in the dropdown by clicking Create Location). Your Equipment Location should be the same on every asset.
Note: If you are creating a new location please only create it on that first asset and then send us an activity request to have us approve the new location. Please do not create a new location on each asset as this duplicates the locations in the system.

Step 5: Click Proceed.
Step 6: Select your structure and click Re-Calculate at the bottom.

Step 7: Click Proceed
Step 8: Click Submit to Credit
Note: A majority of the time your application should be automatically approved so it will not need to go back through credit approval. If your application does have to go back through credit approval, please allow the Credit team some time to re-approve this application.
Report List
Who is this applicable to?
Super User, Portal Administrator, and Portal User.
You can generate following reports:
• Asset by Contract Report
• Contract Report
Generating Asset by Contract report
The Asset by Contract report lists the details of the assets for a particular contract. To generate a report for Asset by Contract, perform the following steps:

1. Hover over Reports > Report List and click Asset By Contract Report.
2. Optionally, enter the Template Name in case you wish to save the report template for future use. You can generate a report without saving the template for it.
3. In the Contract Filter Option field, choose if you wish to view the report for all available contracts (All), a specific contract (One), or a set of contracts (Range).
All
1. Optionally, you can further choose to enter information for the following filters:
• Customer Name: Select the Customer Name from the drop-down list.
• Program: Select the Program from the drop-down list.
• Contract Booking Status: Select the Contract Booking Status from the drop-down list.
• Commencement Date Range: Select the From Commencement Date followed by To Commencement Date.
• Maturity Date Range: Select the From Maturity Date followed by To Maturity Date.
2. Select the Report Privacy as required.
• Private: Generated Report/Template would be visible only to the person who created it and portal admins.
• Public: Generated Report/Template would be visible to all Dealer Portal users
3. Select the Output Format of the report
4. Select Show Custom Fields if you wish to add the custom fields to the report.
5. Select the fields which should be included in the report.

Note: In case you choose to generate a report for a specific contract (One), then select the Sequence # for which you wish to generate the report. For a set of contracts (Range), select the From Sequence # followed by selecting To Sequence #.
To Group Similar Groups Together
Using the Group By option, you can group similar field values together. For example, if you wish to group the data using the Commencement Date field, then all the contracts having the same commencement date will be grouped together. Perform the following steps to use Group By option.
1. Select the Field Name using which you wish to group the data.
2. You can group the data in the report using one field only.
3. Click No and select the toggle button to turn it on.
4. Click anywhere outside the Group By column to see the change in value. The value of the Group By for the selected field turns to Yes.

To Sort the Report in Ascending or Descending Order
The Sort By option allows you to sort the report in ascending or descending order. You can sort the report using one field only. Perform the following steps to use Sort By option.
1. Click No corresponding to the field using which you wish to sort the report.
2. Select the toggle button to turn it on.
3. Click anywhere outside the Sort By column to see the change in value. The value of the Sort By for the selected field would turn to Yes.
4. In case you also wish to sort the report in descending order, click Ascending in the Sort Order column and select the toggle button to turn it off. By default, the report would be ordered in ascending order.
Note: If the toggle button is turned on, it indicates that the data would be ordered in ascending order. Alternatively, if the button is turned off, the data would then be ordered in descending order.
5. Click anywhere outside the Sort By column to see the change in value. The value of the Sort By for the selected field would turn to descending.

6. Optionally, click Save if you wish to save the report template for future use.
7. Click Generate Report to generate the report.
8. Upon successfully generating the report, you receive the following success message.

9. The generated report automatically opens in a new browser tab from where you can download the same.
Contract Report
The Contract report lists the details of a particular contract. To generate a Contract Report, perform the following steps:

1. Hover over Reports > Report List and click Contract Report.
2. Optionally, enter the Template Name in case you wish to save the report template for future use. You can generate a report without saving the template for it.
3. In the Contract Filter Option field, choose if you wish to view the report for all available contracts (All), a specific contract (One), or a set of contracts (Range).
All
1. Optionally, you can further choose to enter information for the following filters:
• Contract Booking Status: Select the Contract Booking Status from the drop-down list.
• Customer Name: Select the Customer Name from the drop-down list.
• Program: Select the Program from the drop-down list.
• Commencement Date Range: Select the From Commencement Date followed by To Commencement Date.
• Maturity Date Range: Select the From Maturity Date followed by To Maturity Date.
• Sort By: Select the option as Commencement Date or Maturity Date.
• Order By: Select the option as Ascending or Descending.
2. Select the Report Privacy as required.
• Private: Generated Report/Template would be visible only to the person who created it and portal admins.
• Public: Generated Report/Template would be visible to all Dealer Portal users
3. Select the Output Format of the report.
Note: In case you choose to generate a report for a specific contract (One), then select the Sequence # for which you wish to generate the report. For a set of contracts (Range), select the From Sequence # followed by selecting To Sequence #.
4. Optionally, click Save if you wish to save the report template for future use.
5. Click Generate Report to generate the report.
6. Upon successfully generating the report, you receive the following success message.

7. The generated report automatically opens in a new browser tab from where you can download the same.
Report Template
• Updated on 20 Mar 2024
• 1 Minute to read
• Share
• Dark
Who is this applicable to?
Super User, Portal Administrator, and Portal User.
The Report Templates page displays the report templates created by you in the past. To view the report templates, hover over Reports and click Report Templates. For each listed report, you can view the following set of information.
| Element | Description |
|---|---|
| Template Name | The unique name of the report. |
| Report Type | Defines the report type. |
| Created By | Name of the template creator. |
| Create Date And Time | Date on which the create request was submitted. |
| Privacy | Defines the Report as Private or Public. |
To edit the report template, perform the following steps:

1. Click the template name.
2. Edit the editable fields as required by you.
3. Optionally, click Save if you wish to save the report template.
4. Click Generate Report to generate the report.
Report Scheduler
• Updated on 20 Mar 2024
• 1 Minute to read
• Share
• Dark
Who is this applicable to?
Super User, Portal Administrator, and Portal User.
The Report Scheduler allows you to schedule report generation. The scheduled reports will be sent to you on your email based on the frequency selected by you. Before proceeding to scheduling report generation, ensure that you have a report template created for it.

Perform the following steps to schedule report generation.
1. Hover over Reports and click Report Scheduler.
2. Click Create New Schedule. This action opens Report Schedule window.

3. Under the Report Schedule Steps section, select the Report Type from the drop-down list as Asset by Contract Report or Contract Report.
4. Select the Report Template from the drop-down list.
5. Click Add Report to continue. The selected report appears in the list-view.
6. Enter the Schedule Name, followed by selecting the Schedule Type. Depending on the selection of Schedule Type, follow any one of the following.
One Time
Note: The system assigns a Schedule number.
1. Click the Calendar icon to set the Effective Date and the Clock icon to set the Time.
2. In case you wish to send the generated report to more recipients, Under the Report Schedule Recipients section, enter the Recipient Name and Recipient email id.
3. Click Add Recipient to add the recipient.
4. You can add multiple recipients by entering the recipient details and clicking the Add Recipient.
5. Once all the details are filled in, click Create Schedule to schedule the report.

Recurring
1. Select the Frequency as Daily, Weekly, or Monthly from the drop-down list.
2. Click the Calendar icon to set the Effective Date and the Clock icon to set the Time.
Note:
• For Recurring schedules, if the selected frequency is Daily, then the report will be generated daily on the scheduled time.
• If the selected frequency is Weekly, then the report will be generated on Monday at scheduled time.
• If the selected frequency is Monthly, then the report will be generated on first day of the month at scheduled time.
3. Under the Report Schedule Recipient section, enter the Recipient Name and Recipient email id.
4. Click Add Recipient to add the recipient.
5. You can add multiple recipients by entering the recipient details and clicking the Add Recipient.
6. Once all the details are filled in, click Create Schedule to schedule the report.

7. The system displays the success message Report schedule saved successfully. The newly created report schedule appears in the list-view.

Servicing Tab
Customer
Selecting the customer tab will open a summary of your customers showing you their customer number, the contact name, phone number address, their overdue status and general account status.
• You can utilize the Customer Tab to pull the customer number for locations when completing an application. Simply input the account number in the location code field for your application to identify a current location.

Selecting the three dots to the far right of the customer will reveal options to view details, view guarantors of view contacts and addresses.

Customer Details will show details on their LOC limit, a list of active contracts and a list of assets and an indicator of their payment status.

Active contracts are easily exported with a click of a button to Csv or XLS formats.
Service Requests
By clicking on the Service Requests option in the drop down you can get a view of all your service requests and their status as well as creating a new service request. These are routed to the appropriate Raymond Leasing department based on the drop down selected.


Assets
View Assets
View all assets by customer by selecting this option from the drop-down menu.
Your dashboard will now populate with all the assets for your dealership.
These can then be organized by Asset type, Contract type or status.
You will also be provided with a view of the active assets on contract, the total cost or portfolio value under contract, and the expected residual for the portfolio.


Assets will be listed in the bottom box showing their Alias or unique ID, their contract number Product type, Customer Asset type Cost, status and term length. This list is easily exportable and filtered for customization to your needs.

Clicking on the contract number hyperlink will bring up details for that individual asset with the options to change its location, view its unique features or view the contract details.
Clicking on the contract number will take you to details for that contract with options to view a payment schedule or view the asset details.

Request Location Change
You have the ability to change an asset location for your customers. This is important to ensure your customer is correctly billed for sales tax. Under the Servicing Drop down select the Asset tab and select the drop down for Request Location Change. There you can submit a request for a new asset location.

Assets For Sale
Provides a list of Raymond assets available for sale to your dealership.

View Contracts
Shows contracts by customer.

Manage Payoff Quotes
Here you will be able to view all payoff quote requests providing a list of pending items and their status.
Click the Bottom right “Create New Payoff Quote” to initiate a payoff quote request.


Enter the payment number and select the payoff type.
Payoff at inception?
Payment number?
Customer Details
This will allow a dealer to check current credit standing for a customer.
View Invoices

Service Requests
Send the queries to your Lessor via the Service Request module in Customer Portal. You can raise a new service request using any of the following methods:
1. Scroll down the list of Service Request and click Raise New Service Request.
2. Begin by entering a Summary for the request, followed by a brief Description.
3. You can associate a Contract # to the request from the dropdown list or use the option to associate assets
TIP
If you have selected a Contract #, then SELECT ASSETS section will only list assets associated to the respective contract.

4. With all the required details filled in, click Submit to submit the Service Request.
Upon creating a request successfully, you’ll receive a success message as follows:

The request created will be displayed on the Service Requests window along with the status of the request.

Quote Worksheet Example
Opportunity ID is found on the top right of the quote sheet.

Selecting or Creating a Customer
If you are not using the Easy Button, you will need to select a customer type before proceeding with the credit application.
Selecting an Existing Customer:
• Choose Existing Customer (default selection).
• Type the customer’s name; matching records appear automatically.
• Select the correct customer with the corresponding Tax ID.


Creating and Entering a New Customer:
If the customer is new, select the New Customer radial button.

Steps to Create a New Customer:
1. Complete the required customer credit information fields.
o Fields marked with a red asterisk (*) are mandatory and must be filled out to proceed.
2. Enter the customer’s legal and business addresses, along with key contact information.

Adding a Customer Address
Steps to adding a Customer Address:
1. To add an address – Click “Add”

This action opens the Add New Address dialog box.
2. Deselect the Billing Address checkbox if it is different.
3. Enter Address Line 1, Address Line 2, Country, State, City, and Postal Code.
4. Click Cancel to exit without saving any details.
5. Click OK to continue.
The added address should appear in the address box.
Note: For the application, the Main address should be the company’s Registered Address.

Adding a Customer Contact Information
Steps to adding a Customer Contact Information:
1. To Add to add the contact.

This action opens the Add New Contact dialog box.
2. Select the Contact Type from the drop-down
3. Enter First Name, Last Name, Email, Phone, and Address.
4. Click Cancel to exit without saving any details.
5. Click OK to continue.
The added contact should appear in the Contact box.
6. Click Save and Continue.

Next Steps Based on Request Type:
• If “Deal Request” was selected:
o After entering customer information, the Program Type section will appear at the bottom left of the page.
o Select the appropriate promotional program (one per application) from the dropdown menu.

• If “Credit Request” was selected:
o Instead of a program selection, a Credit Line section will be displayed at the bottom left of the page.
o Enter the requested credit line amount in the designated field.

Using an Existing Credit Line or Creating a New One
If you select “Deal Request” and the customer is an existing customer with a valid, open line of credit, you will be given two options:
1. Use Customer Line(default selection)
2. Create New Credit Line
Using an Existing Credit Line
• By default, the system selects “Use Customer Line” if the customer has an active credit line.
• A Credit Line Box will appear, displaying:
o Approved Credit Amount
o Utilized Amount
o Available Credit Amount
• If the deal request amount exceeds the available credit, you will not be able to proceed.
• If the deal request amount is equal to or less than the available credit, you can proceed by drawing upon the existing credit line.
Creating a New Credit Line
• If you do not want to use the existing credit line, select “Create New Credit Line” instead.
Proceeding to the Next Step
• Once you have made your selection, click “Proceed” at the lower right of the screen to continue to the Guarantors & Co-applicants section of the application.
![]()


Guarantors & Co-Applicants Node
In this section, you can add cross-corporate guarantors or personal guarantors to the application.

Using Existing Guarantors
• If the customer is an existing customer, any previously used guarantors will be displayed.
• By default, the system will select all guarantors.
• You can choose to keep or remove a guarantor by checking or unchecking the radial button on the top left of their name.
• You can edit a guarantor by clicking the edit icon on the top right of their name

Adding a New Guarantor
• If the customer does not have any guarantors listed, you can add a new one by clicking the “Add” button.
o This action opens the Add Guarantor dialog box.

In the add guarantor dialog box, enter the guarantor information, then click OK.
o Fields marked with a red asterisk (*) are mandatory and must be filled out to proceed.

Proceeding to the Next Section
• If you do not wish to add a guarantor, you can proceed by clicking “Proceed” at the bottom right of the page.
Assets Node
The Assets section will only appear if you are creating a “Deal Request.” This is where you will add equipment to the credit application.
Auto-Populating Assets with the Easy Button
• If you used the Easy Button, the system will automatically populate the assets on this screen.
Manually Adding an Asset
• If the Easy Button was not used, you will be prompted to manually add an asset.
• Fields marked with a red asterisk ( * ) are required and must be completed to proceed.
• You can only add one type of asset in this screen; however, you can specify multiple quantities of that asset.


Proceeding to the Next Step
• Once all asset details are entered, click “Proceed” at the bottom right of the screen to continue.
Review/Modify Assets
After clicking Proceed, you will be presented with a screen displaying the asset(s) you have added.
• To add more assets, click the Add Assets button at the bottom right.
• To modify or remove an asset, click the three dots next to the asset line item.

Once all assets have been confirmed, click Proceed on the bottom right to continue to the Structure Node.

Setting Up a Parent/Child Relationship
If you need to add a child asset (e.g., battery, charger, attachments), follow these steps:
1. Click the Add Assets button.
2. Fill in the required fields for the child asset.
3. In the same dialog box, locate the Parent Asset drop-down menu.
4. Select the appropriate Parent Asset from the list.
5. Click Save to finalize the child asset relationship
By assigning a Parent Asset, the system will link the child asset to the main equipment, ensuring it remains part of the same structure.
Proceeding to the Next Step
• Once all assets have been reviewed and confirmed, click “Proceed” to continue to the next section, Structure Node.

Structure Node
The Structure Node allows you to review the added assets, enter deal structure details, and choose a Product Promotion Program from the Product Details section.


If you have additional asset types to include, you will need to create a new structure for each. This can be done in the Preview Node by clicking “Add New Structure.”
On this screen, you can also:
• Add additional details such as cash down or trade amounts (left side of the screen).
• Click “Evaluate” to process the structure.
• Click “Calculate and Add” to finalize it.

On the right side of the screen, a preview of your structure is displayed. You can:
• Modify the structure by clicking the Edit icon on the structure line.
• Remove the structure by clicking the Trash Can icon.

If you modify a structure, you must click “Evaluate” and then “Re-Calculate” before proceeding.
Once all structures are completed, click “View Structures” at the bottom right of the screen to proceed to the Preview Node.
Preview Node
The Preview Node allows you to review the structure before submitting the credit application.
• On this step you can:
o Add a New Structure
o View the Payment Schedule
o Click Add New Structure if additional asset types are needed.
o Navigate to previous sections using the Progress Wizard at the top of the screen.

Adding Another Structure to the Credit Application
Important Note:
If you need to add a new structure for a different asset type, click “Add New Structures.“

This will take you back to the Structure Node, where you can enter details for the new asset type. Due to a system limitation, you must manually remove the previous asset that was tied to the original structure. Do this by clicking the three-dot menu on the asset line and selecting Remove.
After creating a new structure, follow the same steps as before:
1. Click “Evaluate.“
2. Click “Re-Calculate and Add.“
3. Return to the Preview Node to review.
4. Repeat for each additional structure needed.
Adding Comments and Documentation
Before submitting the credit application, you can add comments and upload relevant documents.
To do this:
1. Click on the Comment Icon located on the far right of the application screen.
2. A Comments Box will appear. Click “New Comment.”
3. Choose the Comment Type (Note: The system limits this to “General” by default).
4. Enter a Title in the Title Box.
5. Write any necessary comments in the Body Field.
6. If applicable, upload supporting documents by selecting the Select/Drag & Drop File to Upload option.
Relevant documents may include:
o Signed credit applications
o Refurbishment cost sheets
o Invoices
o Other supporting files related to the credit request


Adding Comments and Documentation
• Once everything has been reviewed for accuracy, click the “Submit” button on the bottom right of the screen.
• A confirmation message will appear displaying your credit application number for reference.

Key Terms
Pull Application – This is the EZ Button function, pulling the Opportunity number and Sort ID into the Odessa Dealer Portal system.
Deal Request – is the process of creating an application with a new customer or customer without a Line of Credit.
Credit Request – is the process of requesting a Line of Credit for an existing customer.
Program – is the Raymond Leasing/Raymond Corp. pricing program utilized and defining the interest rate or other special promotions.
Guarantors or Co-Applicants – are the Personal or Corporate Guarantors on file for a customer.
Asset Alias – is a unique identifying number for each individual asset in our portfolio.
Product – is the specific Raymond lease or loan type sold to the customer.
Payment Frequency – is the stated frequency of expected customer payments.
No. of Deferral Payments – is used for payment deferrals added to the front of the lease.
Due Date – is the date the customer payment will be due for each billing cycle.
No. of Inception Payments – Is the number of advance payments. The system defaults on the inception period of ‘1’ for leases because the first payment is typically due at the beginning of the lease term. For loans, however, the inception period should be ‘0’ since payments generally begin after funding.
Asset Alias – Alias is an alternate name given to the asset for identification, which also serves as a secondary search option
Asset Catalog – Refers to the Asset Model Number 8FGU25, for example.
Takedown – The process of reviewing the finalized lease packet and submitting it to RLC.
Down Payment – is any amount the customer is adding to the front of the lease.
Final Lumpsum Amount – is a payment made at the end of the lease as a balloon payment.
Inactive Leases – are paid off leases with zero dues or terminated contracts.
More Help & FAQs
Additional training resources are under development and coming soon. Submit your suggestions for training resources or questions for the FAQ section: RLCDealerPortal@raymondcorp.com
- Are there currently any notifications set up in the system for when an application receives credit approval? At this time, the system does not have any notification features set up. You will need to periodically check your applications to see if they have been approved – they will show with an Accepted status.
- Will we be notified once our service request has been completed? Currently, there is no notification feature in this system. You will need to check the Service Requests module to see if your request has been closed.
- Can I copy another user’s report template? Currently, the system does not have a copy function for another user’s report template. If you need to set up a similar template, we recommend viewing the other user’s template and copying down the fields they completed so you can add them to your own.
- How do I generate a Quote Sheet? Unlike our legacy system, there is no Quote Sheet that is generated from Odessa at this time. You may utilize the Structure card as an alternative for the Quote Sheet as it contains the same information.
- Are the customers in my portal to choose from only my customers? Similar to our legacy system, you can view all customers in Raymond Leasing’s portfolio. They are not specific to the customers you may be used to working with.
- If I need to make a change to my application after submitting it to Credit, how do I do that? To make any changes to an application, it must first be in an Accepted status. If it is in an Accepted status, you can select the Amend option by clicking on the three dots to the right of your application’s status.
- How do I override a residual value on an asset? You can override the residual value of an asset by editing the asset in the Structure node and navigating to the field labeled Customer Expected Residual. The figure in this field can always be overridden with any dollar amount. Any dollar amount that goes above and beyond what Raymond Leasing would offer for that asset would require a guaranty to be signed by the dealership. The difference of the allowed residual value and increased residual value would be listed in the Dealer Guaranteed Residual field, which is adjacent to the Customer Expected Residual field.
Be sure to bookmark this page for future reference: Raymond Lease – Dealer Portal Training Guide
Make note of these support contact options:
- Work directly with your primary Raymond Leasing Representative.
- Trouble logging in? Or you don’t have an account set up?
- Request Dealer Portal access by submitting this FORM.
- General Dealer Portal Inquiries: rlcdealerportal@raymondcorp.com
- Technical Issues: ithelpdesk@raymondcorp.com
- (Please include “Leasing” in the email subject line.)
Post-Live Communications to be aware of:
August 12, 2025: Week One Check-In
August 15, 2025: Easy Button Update
August 18, 2025: Week Two Check-In, Support & New Resources
August 26, 2025: Week Three Check-In, Implemented Fixes & In-Progress
Contact Us
For assistance in structuring leases or additional information, don’t hesitate to get in touch with one of the following associates:
| Associate | Role | Phone | |
|---|---|---|---|
| Erica Granan | Supervisor | 607-656-2443 | Erica.Granan@raymondcorp.com |
| Kelly Bushnell | Documentation and Funding Specialist | 607-788-0376 | Kelly.Bushnell@raymondcorp.com |
| Kimberly Cooke | Documentation and Funding Specialist | 607-788-5789 | Kimberly.Cooke@raymondcorp.com |
| Emily Martin | Documentation and Funding Specialist | 607-875-4585 | Emily.Martin@raymondcorp.com |
| Jody Mowery | Documentation and Funding Specialist | 607-656-2362 | Jody.Mowery@raymondcorp.com |
| Stephanie Pierpaoli | Documentation and Funding Specialist | 607-656-2170 | Stephanie.Pierpaoli@raymondcorp.com |
Please contact us for any general questions or concerns: RLCDealerPortal@raymondcorp.com
Don’t have an account set up? Request Dealer Portal access by submitting this FORM.
© 2025 The Raymond Corporation